Gilding fun :)

I am trying out my new toy, the Indigoblu Gilding Starter set :)
I saw gilding with flakes on one of the crafty tv shopping channels years ago. I think it was Dawn Bibby doing it. At the time, I couldn't afford to try it. But this is a different make of flakes etc. now,and cheaper, and I managed to get hold of a starter set to try at last.
You get a special extra-sticky glue called 'flitterglu'.
I thought, ok, this is just going to be PVA stuff with a fancy label, isn't it?
But no! This really IS sticky!!! Like, "OMG I can't separate my fingers" sticky!!! But it's ok it comes off with a good wash in water and soap.
- As well as the glue you get a spatula,
- some felty sponge to make an 'ink pad' with,
- a small rough almost wiry sponge called a 'scoochy',
- a bottle of stamp cleaner (though the soapy water worked fine),
- a strong A5 size plastic box,
- a pot of flakes,
- some A5 sheets of card
- an instruction leaflet.
The kit was just under £20. Ok it was treat ;)
This is what you do-
- wipe out the box with an anti-static pad/cloth
- empty the flakes into this box and spread them out
- cut a small square of the spongey stuff for your 'ink pad'
- spread about a teaspoon of glue onto the pad
- apply this to your stamp (not too much)
- gently press stamp to card (just a 'kiss', no need to press hard)
- dunk the card into the flakes
- pat the flakes gently with your fingertips, make sure all glue is covered
- tap off excess gently
- use the 'scoochy' to scrub off the flakes back into the box- they can be reused- very little is actually 'caught' each time.
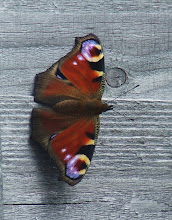
- the result is a stamp image in gilded flake.....
Here's quite a detailed image, but it still worked...
in the background you can see the pots of glue etc., and the flakes in the A5 box:

The gilded imagestays intact i.e. dosen't rub off easily like glitter. I was able to put the card under the guard of a paper timmer without it marking the image. Here it is trimmed, ready for using on a card:

Cool, yeah?
Looking forward to using it to edge cards and ATCs too, and trying other coloured flakes. They do a nice coppery one, which would be nice on my cat stamps, I think :)
Starter kit & more info available here (no affiliation blah blah blah..! )
**** *** **** *** **** ***
Love, tea & cake,
Helena
Helena


6 comments:
Very pretty! all sparlkey!
Love!!
HA! I have all the gilding stuff you listed Helena - in a box hidden away. Gonna follow your instructions and have a go 'cos I bought all the stuff separately in a craft shop but no destructions came with it of course. Thank you kindly - you got a great result!!
Will be emailing as I'd like to buy your two patchwork stamps if I'm not too late!
Hugs, Di xx
Coo!! That's seriously FAB!
That looks lovely!
Gilding is addictive - if you ever get the chance to try the real thing with gold leaf do have a go, shame it is so expensive, everyone should be able to play with gold!
Sarah x
That's a beautiful heart! ;)
Post a Comment